Simple and elegant component-based UI library (Riot.js)
riot.js 是一个简单优雅的 js UI框架。具有自定义标签,简单语法,API简单,体积小,学习成本低等特点。riot.js 使用Model-View-Presenter (MVP)设计模式来组织代码,这样它能够更模块化、更具可测试性且易于理解。riot.js 仅仅提供了帮助UI渲染相关的基础功能,并不具备其它复杂的功能,因此其体积很小,压缩后仅有 10.39KB (react.min.js 大约 47.6KB ),很适合组件类的业务开发。
目前今日头条PC站,百度Hi的JS组件部分都是基于riot.js来开发的。
本系列文章,将会在介绍 riot.js 的使用方法的同时,解析其对应的源码内容,riot.js 版本为3.6.1。
Hello world
来一个简单的例子,基于 webpack 构建,依赖 riotjs-loader。
自定义标签代码,content-demo.tag
|
|
html 页面代码如下:
|
|
webpack 入口js文件
|
|
总体来说,riot.js 采用自定义标签的方式来书写UI组件,组件的生命周期仅有 update,updated,mount,unmount 四个。我们通过调用 riot.mount() 函数来决定页面加载哪些组件。
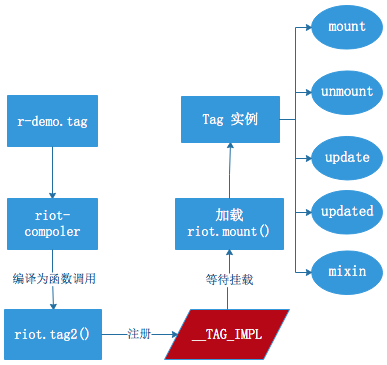
riot.js 运行流程
在上述 demo 中,我们将 <content-demo> 自定义标签写在了 *.tag 格式的文件中,作为一个组件。然后 webpack 打包时会利用 riot-compiler(官方编译工具),将其编译成 js 代码 riot.tag2(),然后将其内容注册在__TAG_IMPL变量中。 最后用户调用 riot.mount() 函数来指定渲染哪个组件。运行流程,如下图所示:
自定义标签命名
riot.js 对自定义标签的书写本身没有任何要求,但是 HTML5 引入了对自定义元素的标准 - Custom Elements 标准。标准中对自定义元素名称有了限制:
“自定义元素的名字必须包含一个破折号(-)所以
<x-tags>、<my-element>和<my-awesome-app>都是正确的名字,而和 是不正确的。这样的限制使得 HTML 解析器可以分辨那些是标准元素,哪些是自定义元素。”
距离来说,如果你的标签名称不带有破折号,那么浏览器会认为自定义元素是 HTMLUnKnownElement,如图所示:
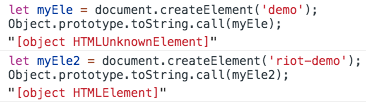
所以,这里推荐在使用 riot.js 自定义标签的时候,遵守带有破折号的命名方式。
编译
编译阶段的主要工作就是将riot语法写的.tag文件转换为可执行的.js文件,这部分主要靠编译器来完成。例子中,content-demo 最终会被编译成如下js代码:
|
|
riot.tag2 函数在 riot.js 源码中的 core.js 文件中,代码如下:
|
|
参数含义如下:
- name: riot 自定义标签的名称
- tmpl: 标签的html内容
- css:
<style>标签中的内容 - attrs: riot 自定义标签的属性
- fn: 用户自定义函数,即
<script>标签中的内容
riot.tag2() 函数将 riot tag 注册到了 __TAG_IMP 对象中,方便之后的使用,css部分则被添加到了 byName 变量中,用于之后统一添加到页面中。在源代码中,还有一个 riot.tag()函数,这个函数用于直接直接创建一个 riot tag 实例的接口,而 riot.tag2() 是暴露给编辑器的接口,本质上功能是一样的。
加载 riot.mount()
组件被注册号以后,并没有被渲染,直到我们调用 riot.mount() 函数后,相应的组件才会渲染到页面上。riot.mount 主要用法如下:
- riot.mount(‘*’, [opts]): 将注册好的所有 riot tag 都渲染到页面上
- riot.mount(customTagSelector, [opts]): 根据标签选择器,渲染指定的 riot tag。 例如:上述示例中,我们也可以这样写 riot.mount(‘content-demo’)。
- riot.mount(selector, tagName, [opts]): 将 riot tag 渲染到指定的节点中。例如: riot.mount(“div#main”, “content-demo”, api) 将
<my-tag>挂载到div#main内。
这里面的 opts 为可选参数,是用户设置的标签的其他属性内容。这里就不过多介绍了,之后的文章会有解释。下面为 riot.mount 注释过的源码:
|
|
当调用 riot.mount 后,通过 selector 参数来查找 html 页面上对应的节点。不在 html 上的节点是不会被渲染的。③处代码为查找过程,其中$$为 document.querySelectAll。之后调用 pushTagsTo 函数来渲染 riot tag。IS_DIRECTIVE = 'data-is' 渲染前,要检查是否含有 tagName 参数,如果有的话即为 上述 riot.mount 的第三个用法。此时需要检测 root 的 data-is 属性值是否和 tagName 相等,如①处。不相等则将 root 设置其 data-is 为 tagName。即 riot.mount(‘div#main’, ‘content-demo’) 渲染出的节点为 :
<div id="main" data-is="content-demo"><content-demo>...</content-demo></div>
最后,通过 mountTo 函数渲染处理好的 riot tag,如②处。mountTo 函数后续会有详解。
代码中使用了 tagName 而不是 nodeName 原因如下:nodeName是node 接口上的property,而tagName是element 接口上的property,所有的节点(元素节点,属性节点,文本节点等12种)都继承了node接口,而只有元素节点才继承了element节点。
取消注册 riot.unregister()
riot 全局变量上还包含 riot.unregister(name) 函数用户取消注册过的内容,通常我们在测试程序的时候,创建同名标签使用。示例如下:
|
|
riot.unregister() 源码十分简单,如下:
|
|
暴露在 riot 全局变量上的函数,还包括 riot.update 和 riot.mixin 两个,将在后面的内容介绍。
源码目录结构
riot 3.6.1 的源码目录结构如下:
|____browser
| |____common
| | |____global-variables.js // 使用到的常量
| | |____util
| | | |____check.js   // 变量类型,属性等检查
| | | |____dom.js     // dom 操作
| | | |____misc.js    // 用到的工具类函数
| | | |____tags.js    // riot tag 操作
| |____compiler
| | |____index.js     // riot tag 模板解析
| |____tag
| | |____core.js      // riot 对外暴露函数接口
| | |____each.js      // riot tag each操作渲染
| | |____if.js        // riot tag if操作渲染
| | |____mkdom.js     // 创建 dom 节点
| | |____parse.js     // riot tag 解析
| | |____ref.js       // riot tag ref
| | |____setEventHandler.js  // riot tag 事件绑定
| | |____styleManager.js     // 样式管理
| | |____tag.js              // riot tag 标签类
|___|____update.js           // riot tag 更新操作
本文涉及到的源码,主要出自 core.js 和 styleManager.js。